ChromeでWeblio検索を簡単に行う方法
Weblioはシソーラス等の機能を備えて、今や日本一の辞書サイトになったということは、誰もが認める事実になっていると思います。
そして、今一番熱いブラウザといえば、Google Chromeです。
http://journal.mycom.co.jp/news/2011/01/04/028/index.html
そのGoogle Chromeから、Weblio検索をコンテキスト(右クリック)メニューで出来るようになったら良いなと思い、設定してみました。
Context Search拡張機能をインストール
以下のリンクからどうぞ。
https://chrome.google.com/extensions/detail/dbpfafcplnjmakknnonpegphpmpmhjhj
Context Search設定
インストールが完了したら、Chromeの拡張設定(chrome://extensions/)から、Context Searchのオプション画面を出して、こんな感じで設定してあげます。

ちなみに、主な辞書別の設定は以下の通りです。
| 辞書種別 | URL |
|---|---|
| 辞書全般 | http://www.weblio.jp/content/%s |
| 類語辞典(シソーラス) | http://thesaurus.weblio.jp/content/%s |
| 英和・和英辞典 | http://ejje.weblio.jp/content/%s |
確認
これでおしまいです!簡単ですね。
※以下はMacの例です。
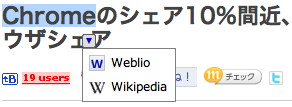
デザインをカスタマイズしてみました
d:id:k2jp:20100308:1267976606 を参考に少しカスタマイズしてみました。
id:k2jpさん、ありがとう!
accessing unknown 〜 component of a property が出たとき
ちょっと躓いたので。
「accessing unknown 〜 component of a property」のエラーが出たときは、多分、import文に不足があります。
- accessing unknown 'position' component of a property
- accessing unknown 'bounds' component of a property
とか出たときは、
NSFileManagerでファイルの属性を取得する
前回の記事でもちょっと書いたけど、NSFileManagerを使うと、ファイルの属性をNSDictionary形式で取得できる。
iOS Reference Library - NSFileManager Class Reference
ファイルシステムの情報を取得する「attributesOfFileSystemForPath:error:」とファイルやディレクトリの情報を取得する「attributesOfItemAtPath:error:」の2つがあるけど、具体的な内容が分かりづらかったのでまとめ。
attributesOfFileSystemForPath:error:の戻り値
| 説明 | 型 | 取得例 |
|---|---|---|
| ファイルシステムの空きノード数 | NSFileSystemFreeNodes | 45625207 |
| ファイルシステムの空きサイズ(bytes) | NSFileSystemFreeSize | 186880847872 |
| ファイルシステム全体のノード数 | NSFileSystemNodes | 60965666 |
| ファイルシステムの管理番号 | NSFileSystemNumber | 234881026 |
| ファイルシステム全体のサイズ(bytes) | NSFileSystemSize | 249715376128 |
attributesOfItemAtPath:error:の戻り値
| 説明 | 型 | 取得例 |
|---|---|---|
| 作成日時 | NSFileCreationDate | "2010-12-30 07:56:22 +0000" |
| 拡張子を隠しているか | NSFileExtensionHidden | 0 |
| 所有者のグループID | NSFileGroupOwnerAccountID | 20 |
| 所有者のグループ名 | NSFileGroupOwnerAccountName | staff |
| 変更日時 | NSFileModificationDate | "2010-12-30 07:56:22 +0000" |
| 所有者のID | NSFileOwnerAccountID | 501 |
| 所有者の名前 | NSFileOwnerAccountName | User Name |
| ファイルのアクセス権 | NSFilePosixPermissions | 493 |
| 参照されている数 | NSFileReferenceCount | 2 |
| ファイルサイズ(bytes) | NSFileSize | 68 |
| ファイルシステム上のファイル管理番号 | NSFileSystemFileNumber | 3245958 |
| ファイルシステムの管理番号 | NSFileSystemNumber | 234881026 |
| ファイルタイプ | NSFileType | NSFileTypeDirectory |
サンプルソースコード
ファイルタイプがNSFileTypeRegularだったら、テキストビューに内容を表示してます。
- (void)loadView {
	[super loadView];

	textView = [[UITextView alloc] initWithFrame:[[UIScreen mainScreen] applicationFrame]];

	/* ファイルの存在確認 */
	if ([[NSFileManager defaultManager] fileExistsAtPath:filePath]) {

		/* ファイルタイプの取得 */
		NSDictionary *dict = [[NSFileManager defaultManager] attributesOfItemAtPath:filePath error:NULL];
		NSString *fileType = [dict objectForKey:NSFileType];

		/* NSFileTypeはNSString型なので、isEqualToStringで比較する */
		if ([fileType isEqualToString:NSFileTypeRegular]) {
			// ファイルをNSASCIIStringEncodingでエンコードしてビューに表示
			NSString *fileCont = [NSString stringWithContentsOfFile:filePath encoding:NSASCIIStringEncoding error:NULL];
			textView.text = fileCont;
		} else {
			textView.text = [NSString stringWithFormat:@"読み込みに失敗しました。\n\nファイル %@ のファイルタイプは %@ です。", filePath, fileType];
		}
	} else {
		textView.text = [NSString stringWithFormat:@"読み込みに失敗しました。\n\nファイル %@ が存在しません", filePath];
	}

	self.view = textView;
}
ファイルの属性を取得するときは
fileAttributesAtPath:traverseLink: ではなく、
attributesOfItemAtPath:error: を使う!
こんな感じで。
- (UITableViewCell *)tableView:(UITableView *)tableView
	cellForRowAtIndexPath:(NSIndexPath *)indexPath {

	NSDictionary *attributes;

	NSString *cellIdentifier = [fileList objectAtIndex:[indexPath indexAtPosition:1]];

	UITableViewCell *cell = [tableView dequeueReusableCellWithIdentifier:cellIdentifier];
	if (cell == nil) {
		cell = [[[UITableViewCell alloc]
			initWithStyle:UITableViewCellStyleDefault
			   reuseIdentifier:cellIdentifier] autorelease];
		/* text setting */
		cell.textLabel.text = cellIdentifier;
		/* fonts setting */
		UIFont *font = [[UIFont fontWithName:@"Times New Roman" size:12.0f] retain];
		cell.textLabel.font = font;
		/* If directory, append UITableViewAccessoryDetailDisclosureButton */
		attributes = [[NSFileManager defaultManager] attributesOfItemAtPath:
			[NSString stringWithFormat:@"%@/%@", self.currentDirectory, cellIdentifier] error:NULL];
		NSLog(@"%@", attributes);
		if ([[attributes objectForKey:NSFileType] isEqualToString:NSFileTypeDirectory]) {
			cell.accessoryType = UITableViewCellAccessoryDetailDisclosureButton;
		}
	}
	return cell;
}
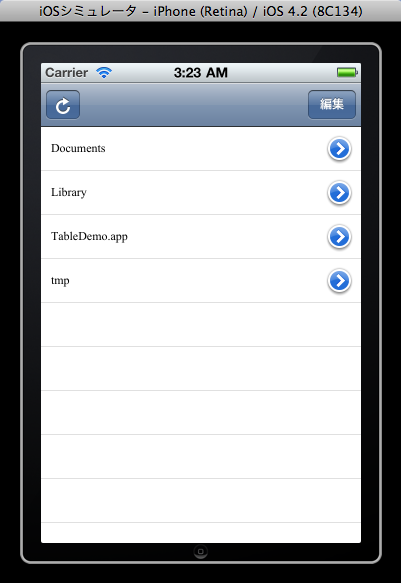
昔のメソッド名の方が短くていい名前><
warning: ’NSTimer’ may not respond to ’+scheduledTime*
timer = [NSTimer scheduledTimerWithTimeInterval:
target:self
selector:@selector(timerCallback:)
userinfo:nil
repeats:NO];
○userInfoと書くべきが、×userinfoとなっていた。
Iとiの違いって分かりづらい!
